
Importing your data into FyneDesk
Bring your existing help desk into FyneDesk in one guided run. Connect Freshdesk, Zendesk, or Zoho Desk directly, or upload CSV files from another system. FyneDesk guides the scope and mapping, shows live progress, and gives you a clear report at the end.
What you can bring across
| Data | From Freshdesk, Zendesk, or Zoho Desk | From CSV |
|---|---|---|
| Companies | Yes | Yes |
| Contacts (your customers) | Yes | Yes |
| Tickets | Yes | Yes (one row per ticket) |
| Ticket conversations & replies | Yes | — (a flat file can't hold a full thread) |
| Ticket attachments | Yes | — |
| Custom ticket fields | Yes | Yes (map your columns) |
| Tags | Yes | Yes |
| Agents | Yes | — |
| Knowledge base articles | Yes | Yes |
A few things worth knowing up front:
- Your original dates are kept. An imported ticket keeps its real created and resolved dates — it won't look like it was created today.
- Tickets from a direct connection keep a source reference in the title, so your team can cross-reference the old record.
- Nothing is emailed to your customers during an import, and no automations fire. Importing is silent.
- You can leave the page. The import keeps running in the background — come back any time to check progress.
Where to find it
In the left sidebar, open Admin, then Settings. Under Developer & Data, choose Import data, then click Choose a source to begin.
Option A — Import from Freshdesk
Step 1 — Get your Freshdesk API key
- Log in to Freshdesk.
- Click your profile picture (top right) → Profile settings.
- Your API key is shown on the right-hand side. Copy it.
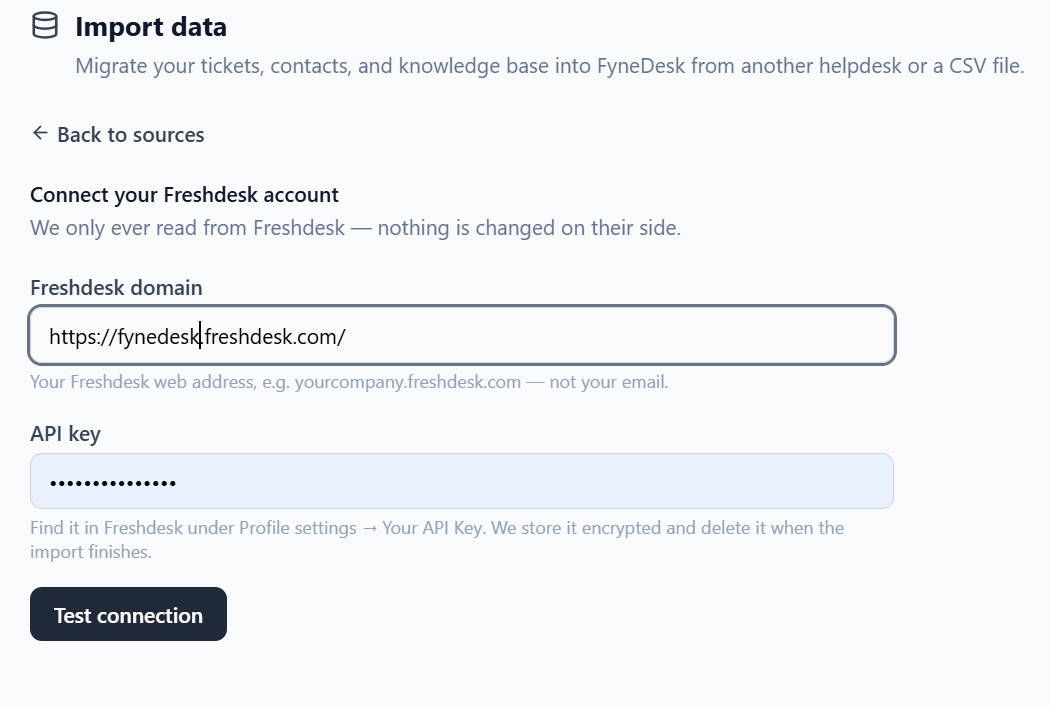
Step 2 — Connect
On the Import data screen, choose Freshdesk, then enter:
- Your Freshdesk domain (the web address, e.g.
yourcompany.freshdesk.com— not your email) - The API key you copied
Click Test connection. FyneDesk checks the key and shows you roughly how much data it found (agents, contacts, tickets, articles) so you know what to expect. FyneDesk only ever reads from Freshdesk — nothing is changed on their side — and your key is stored encrypted and deleted when the import finishes.
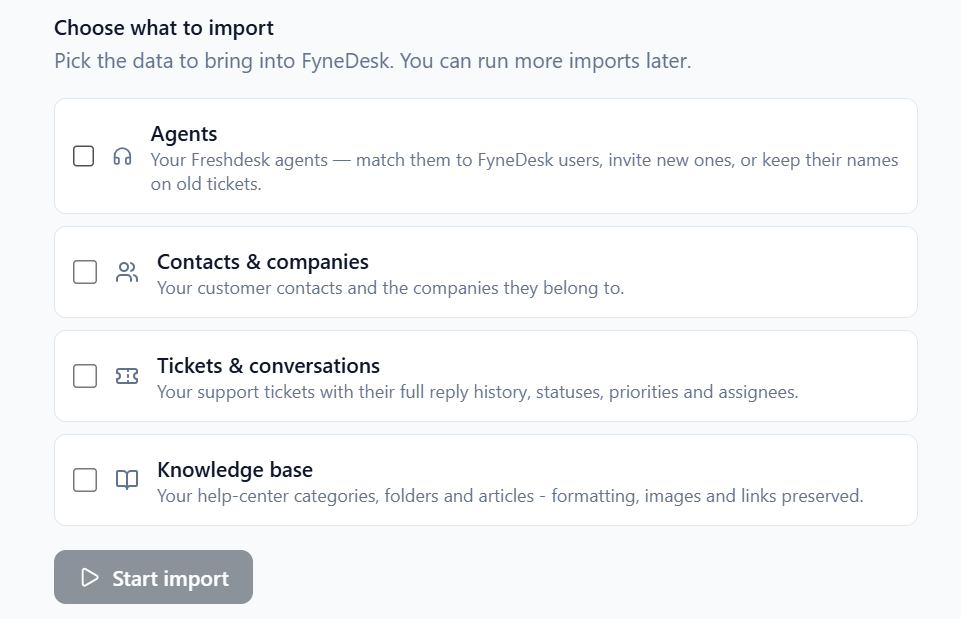
Step 3 — Choose what to import
Tick the things you want to bring across — Agents, Contacts & companies, Tickets & conversations, and Knowledge base. Everything is optional, so import as much or as little as you like, and you can run more imports later.
Step 4 — Review your agents
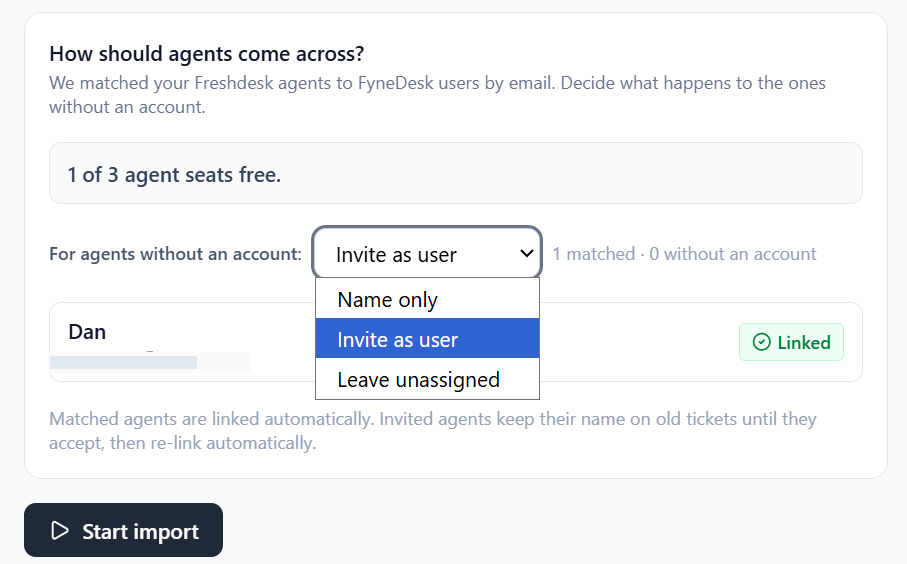
FyneDesk lists the agents it found in Freshdesk and matches anyone who already has a FyneDesk login by email address — matched agents are linked automatically. For agents who don't have an account yet, choose what happens from the dropdown:
- Name only — keeps their name on their old tickets so the history reads correctly, without creating a login.
- Invite as user — sends them a FyneDesk invitation (uses a seat on your plan).
- Leave unassigned — brings their tickets in without an assignee.
You'll see how many agent seats are free before you commit. Invited agents keep their name on their old tickets until they accept, then re-link to their new account automatically.
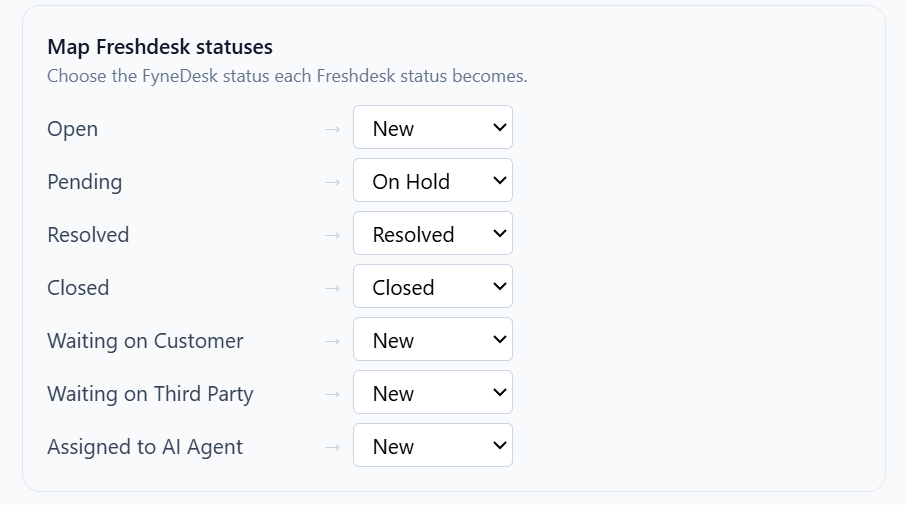
Step 5 — Check the status mapping
Freshdesk and FyneDesk use slightly different status names. On the mapping step, FyneDesk pre-fills sensible matches — for example Open → New and Pending → On Hold — and lets you change any of them. Priorities are mapped the same way.
Step 6 — Run it
Click Start import and watch the live progress. You can leave the page — it keeps running. When it's done you'll get a results report (see After the import below).
Option B: Import from Zendesk
Choose Zendesk, then enter your Zendesk subdomain, an Admin email address, and an API token. FyneDesk tests the read only connection and shows the available agents, contacts, companies, tickets, and knowledge articles before anything is imported.
Create the API token in Zendesk Admin Center under Apps and integrations → APIs → API tokens. Keep the token private and paste it only into the secure FyneDesk connection field.
Option C: Import from Zoho Desk
Choose Zoho Desk and click Connect with Zoho. Sign in to the correct Zoho account and approve the requested read access. After the secure OAuth connection returns you to FyneDesk, review the inventory, choose what to import, and confirm the field and status mapping.
Option D: Import from a CSV file
Use this if your data lives in a spreadsheet, or if you're coming from a different helpdesk.
Step 1 — Add your files
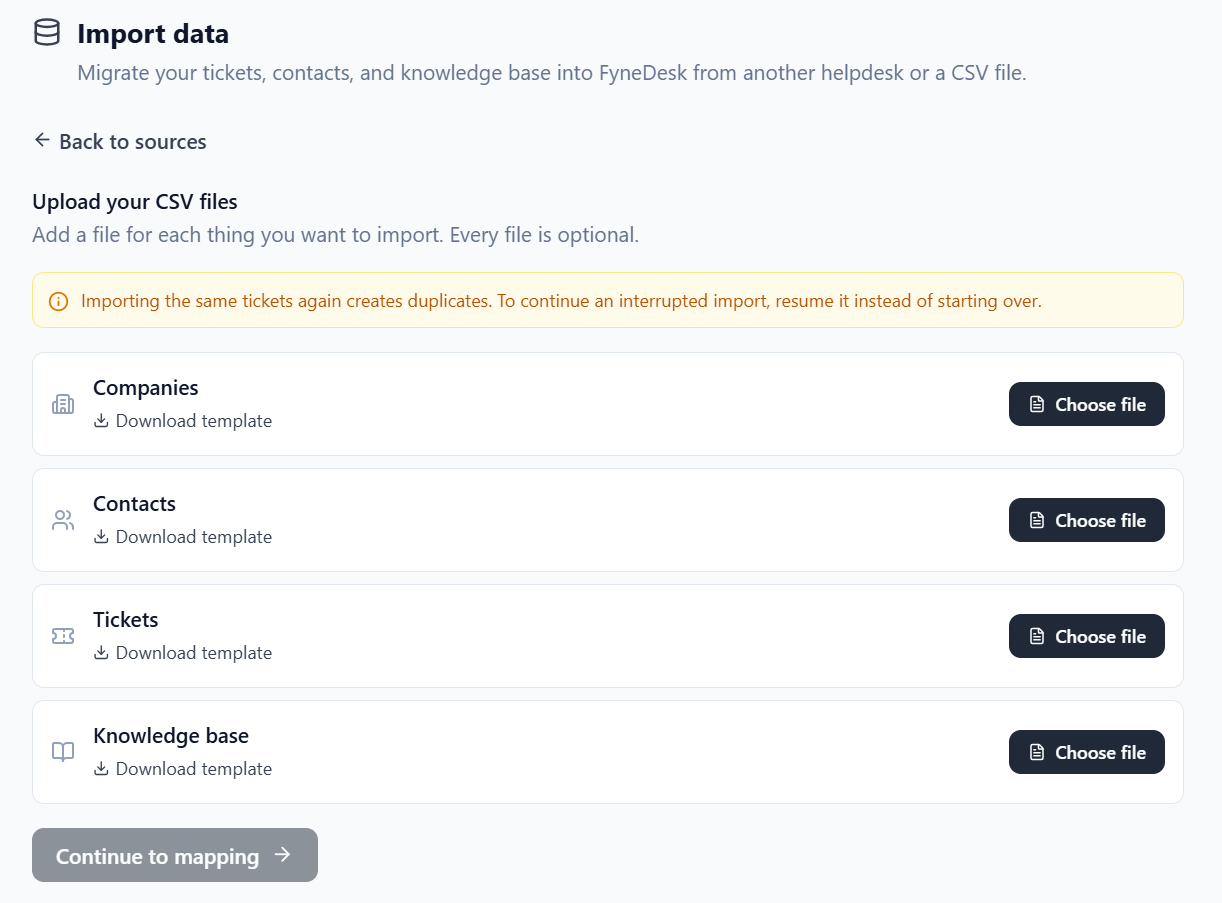
On the Import data screen, choose CSV. You'll see a slot for each type: Companies, Contacts, Tickets, Knowledge base. Add a file for each thing you want to import — every file is optional.
Not sure how to format your file? Click Download template on any row to get a CSV with the right column headings to fill in.
Step 2 — Map your columns
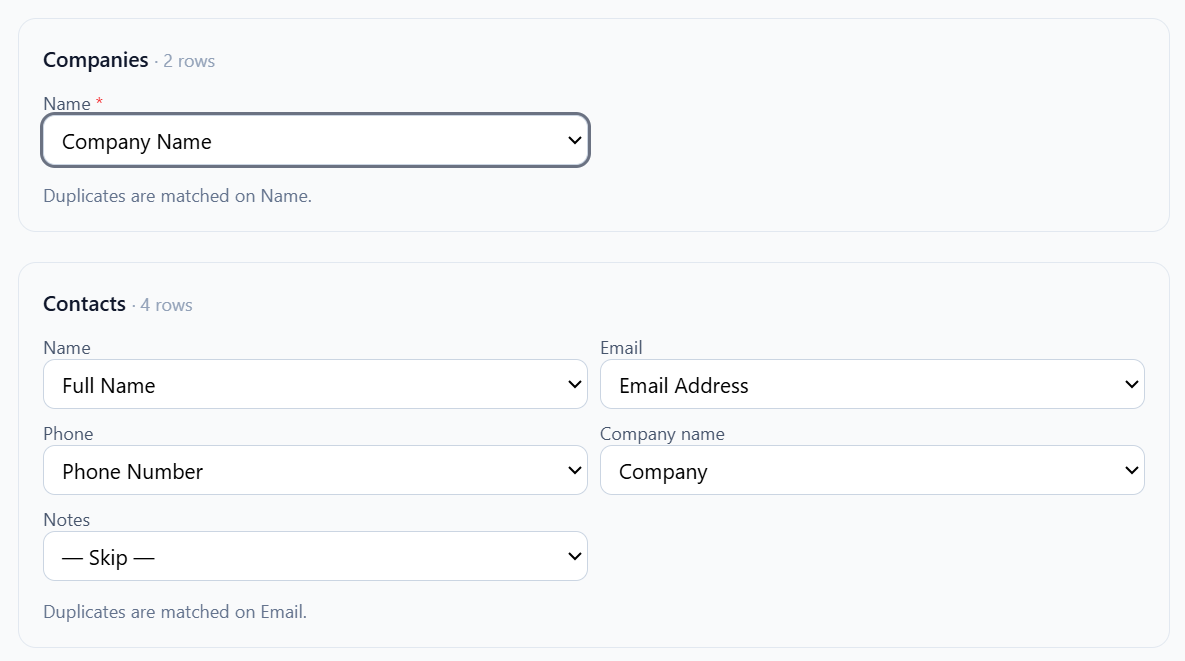
Your spreadsheet's column names won't always match FyneDesk's fields — that's fine. After you upload, FyneDesk shows a mapping screen where it makes its best guess for each field and lets you confirm or change it. For example, you might point your Subject column at FyneDesk's Title field.
Required fields are marked, and you can't start until they're set. Anything you don't need, leave as Skip.
Step 3 — Map your values
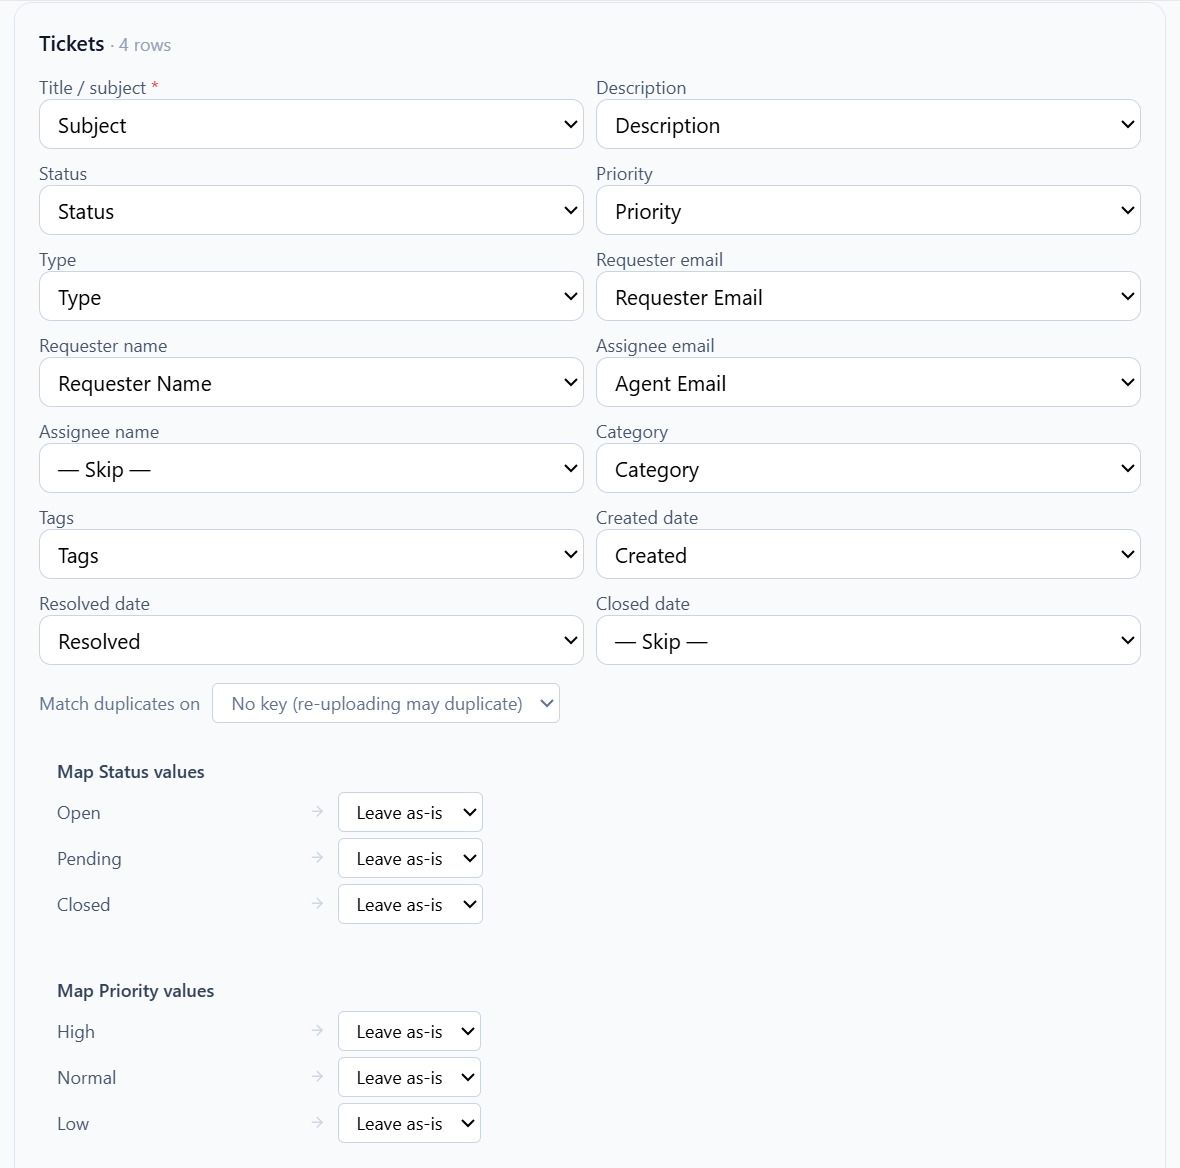
For fields like Status, Priority and Type, FyneDesk shows the distinct values it found in your file and lets you match each one to a FyneDesk value — for example Open → New, or Question → Service request. This makes sure your tickets land in the right state.
Step 4 — Run it
Click Start import, then watch the progress and review the report, just like the Freshdesk flow.
After the import: your results report
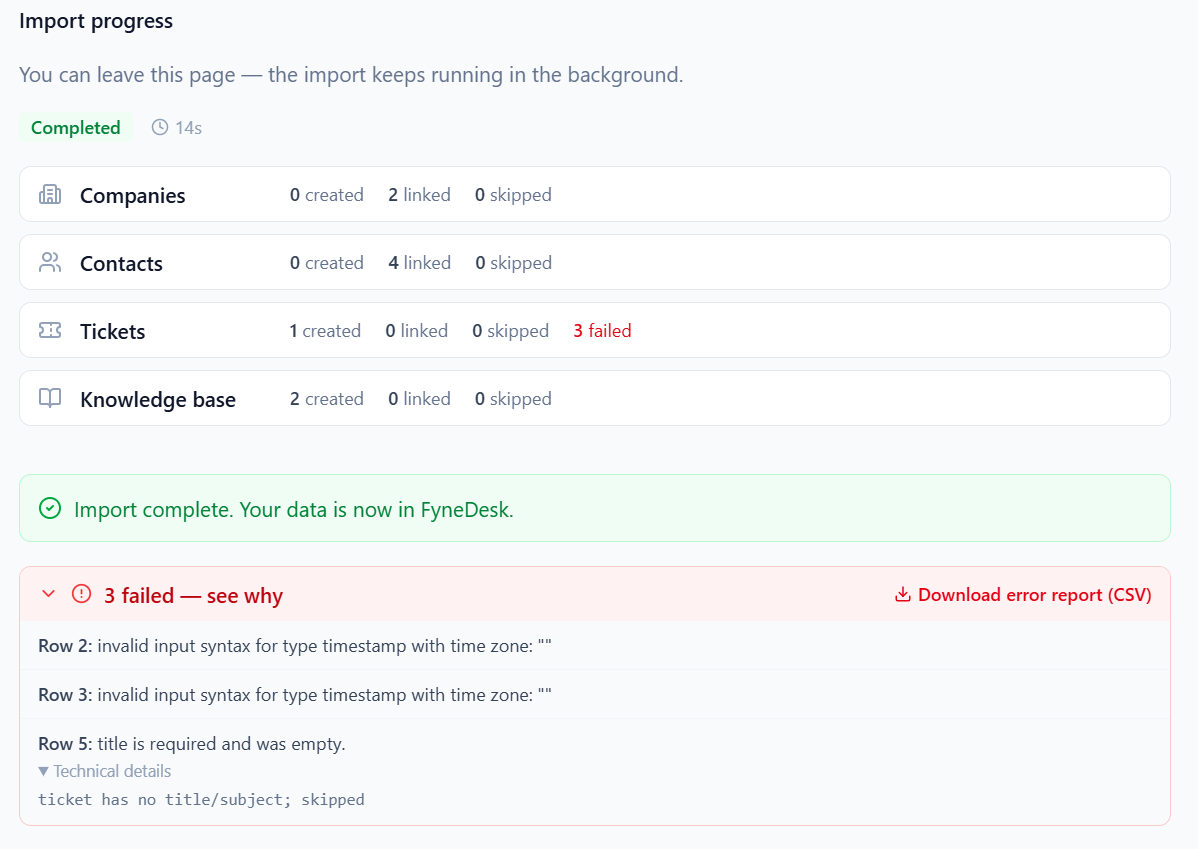
When the import finishes you'll see a per-type summary:
- Created — brand-new records added.
- Linked — records matched to something that already existed (so they weren't duplicated).
- Skipped — already imported, so left alone.
- Failed — rows that couldn't be imported.
If anything failed, you don't have to guess why. FyneDesk tells you exactly what went wrong, row by row, in plain language — for example "Row 2: invalid timestamp" or "Row 5: title is required and was empty." So fixing it is straightforward: click Download error report (CSV) for the full list, correct just those rows in your source file, and run the import again. FyneDesk won't duplicate the records that already came in, so only the fixed rows are added.
Inviting imported agents
If you chose Name only for some agents, they appear as names on their tickets but don't have logins yet. To give them access:
- In the left sidebar, open Admin → Team Members (Admins and Owners with Manage users permission only).
- Click Invite Team Member, enter their email, choose Agent or Admin, optionally set ticket access, then click Send Invitation.
Pausing, resuming and cancelling
- A big import runs in the background — you can close the page and come back.
- You can pause and resume an import, or cancel it. Cancelling keeps whatever was already imported.
- If you step away mid-setup and come back, FyneDesk picks up where you left off rather than starting over.
Running an import more than once
Imports are safe to repeat. If a run is interrupted, resume the same import and it continues from where it stopped without re-importing what's already in. Contacts and companies are matched on email and company name, so they're never duplicated.
Troubleshooting
Imports — common questions and fixes
My knowledge base articles didn't import. Re-run the importer and make sure Knowledge base is ticked. From Freshdesk this comes across automatically — you don't need to export JSON or XML files.
It says "an import is already in progress." You have an import still open. Go back to Import data to view, resume, or cancel it, then start fresh.
Some tickets failed with a status or priority error. The value in your file doesn't match a FyneDesk status or priority. Use the value-mapping step (CSV) or the status mapping step (Freshdesk) to match them, then re-run.
A few attachments didn't come over. Files larger than 25 MB are skipped and listed in the report; the ticket itself still imports.
I can't find my live chat widget code. That's separate from importing — you'll find it under Settings → Website Widget.